


Vizuara AI Agents Bootcamp Day 8
LangGraph: Building Non‑Linear Workflows

Welcome back to Day 8 of the Vizuara AI Agents Bootcamp!
In today’s session, we took a deep dive into LangGraph, a new framework for designing complex AI agent workflows. We compared it with the popular LangChain toolkit, exploring why LangGraph’s graph-based approach is better suited for non-linear, multi-step agent systems.
We then rolled up our sleeves to build two practical agents using LangGraph: an email-sorting AI butler (inspired by Batman’s Alfred) and a vision-enabled assistant that can analyze images and use tools.
We’ll also briefly touch on how to trace and monitor these agents’ decision-making with Langfuse. By the end of this post, you’ll understand how LangGraph works (nodes, edges, state), see it in action through examples, and know how to keep an eye on your agents in production.

Table of Contents
(1) LangChain vs LangGraph – Why a New Approach?
(2) LangGraph Fundamentals: Nodes, Edges & State
(3) Building an Email Sorting Agent (LangGraph Example)
(4) Creating a Vision Assistant Agent (LangGraph Example)
(5) Tracing Agent Workflows with Arize Phoenix
(6) Wrap-Up and Next Steps (Code Resources)
(1) LangChain vs LangGraph – Why a New Approach?

LangChain has been the go-to framework for chaining LLM operations, ideal for straightforward pipelines where tasks happen in a fixed sequence. For example, if you’re building a Q&A bot, you might retrieve documents → summarize them → answer the question in a linear flow. LangChain shines in such scenarios because it’s modular and easy to use when “you know the exact sequence of steps needed”. However, as we tackled more complex agents in this bootcamp, a key limitation became apparent: real-world workflows aren’t always a straight line!
Enter LangGraph. LangGraph is a specialized library (within the LangChain ecosystem) designed for stateful, non-linear workflows. Instead of a fixed chain, you define a graph of possible steps. This means your agent can have branches, loops, and dynamic decision points in its execution path. LangGraph was created to handle multi-agent systems and complex task flows that evolve based on conditions and intermediate results.

In LangChain, you typically rely on built-in agents or chains to handle tools in a hidden “thought-action” loop. In contrast, LangGraph exposes the control flow: you explicitly define what happens after each step. This provides fine-grained control for advanced agents at the cost of a bit more setup. The payoff is huge – you can build non-linear agent behaviors that maintain complex state over multiple steps. LangGraph’s stateful graph structure allows an agent to revisit nodes or decide between different next steps dynamically, something much harder to do with a purely sequential chain.
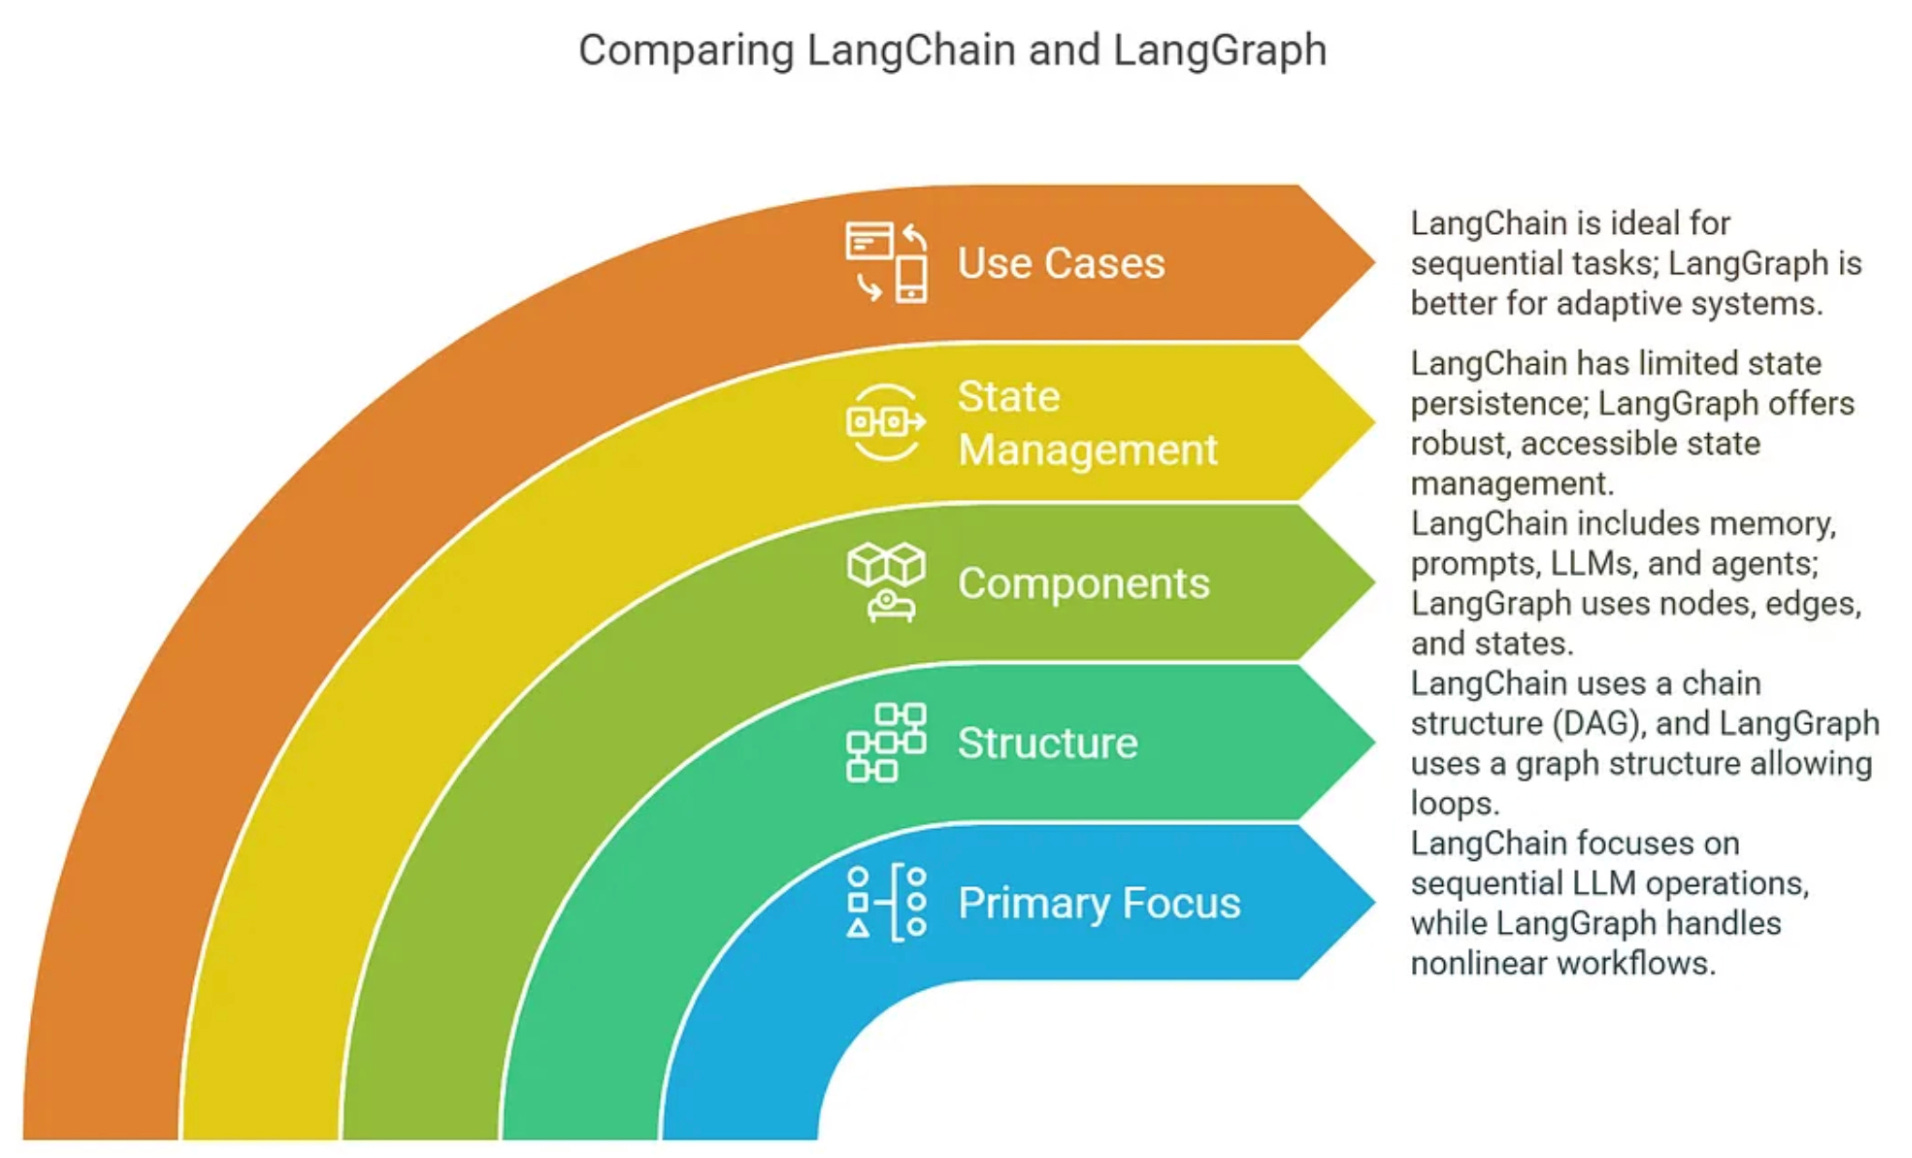
In short, use LangChain for simple, well-defined sequences, and LangGraph when your agent needs to handle conditional logic, loops, or extended context over many turns. LangChain and LangGraph address different needs, and today we saw how LangGraph opens the door to more complex agent workflows.
(2) LangGraph Fundamentals: Nodes, Edges & State
So, how does LangGraph actually work under the hood? In LangGraph, you construct an agent workflow by specifying three kinds of building blocks: Nodes, Edges, and State.
Each Node is a step (an operation or tool invocation), Edges connect nodes and define the possible transitions, and the State is a shared memory carried through the graph. Let’s break down each component:
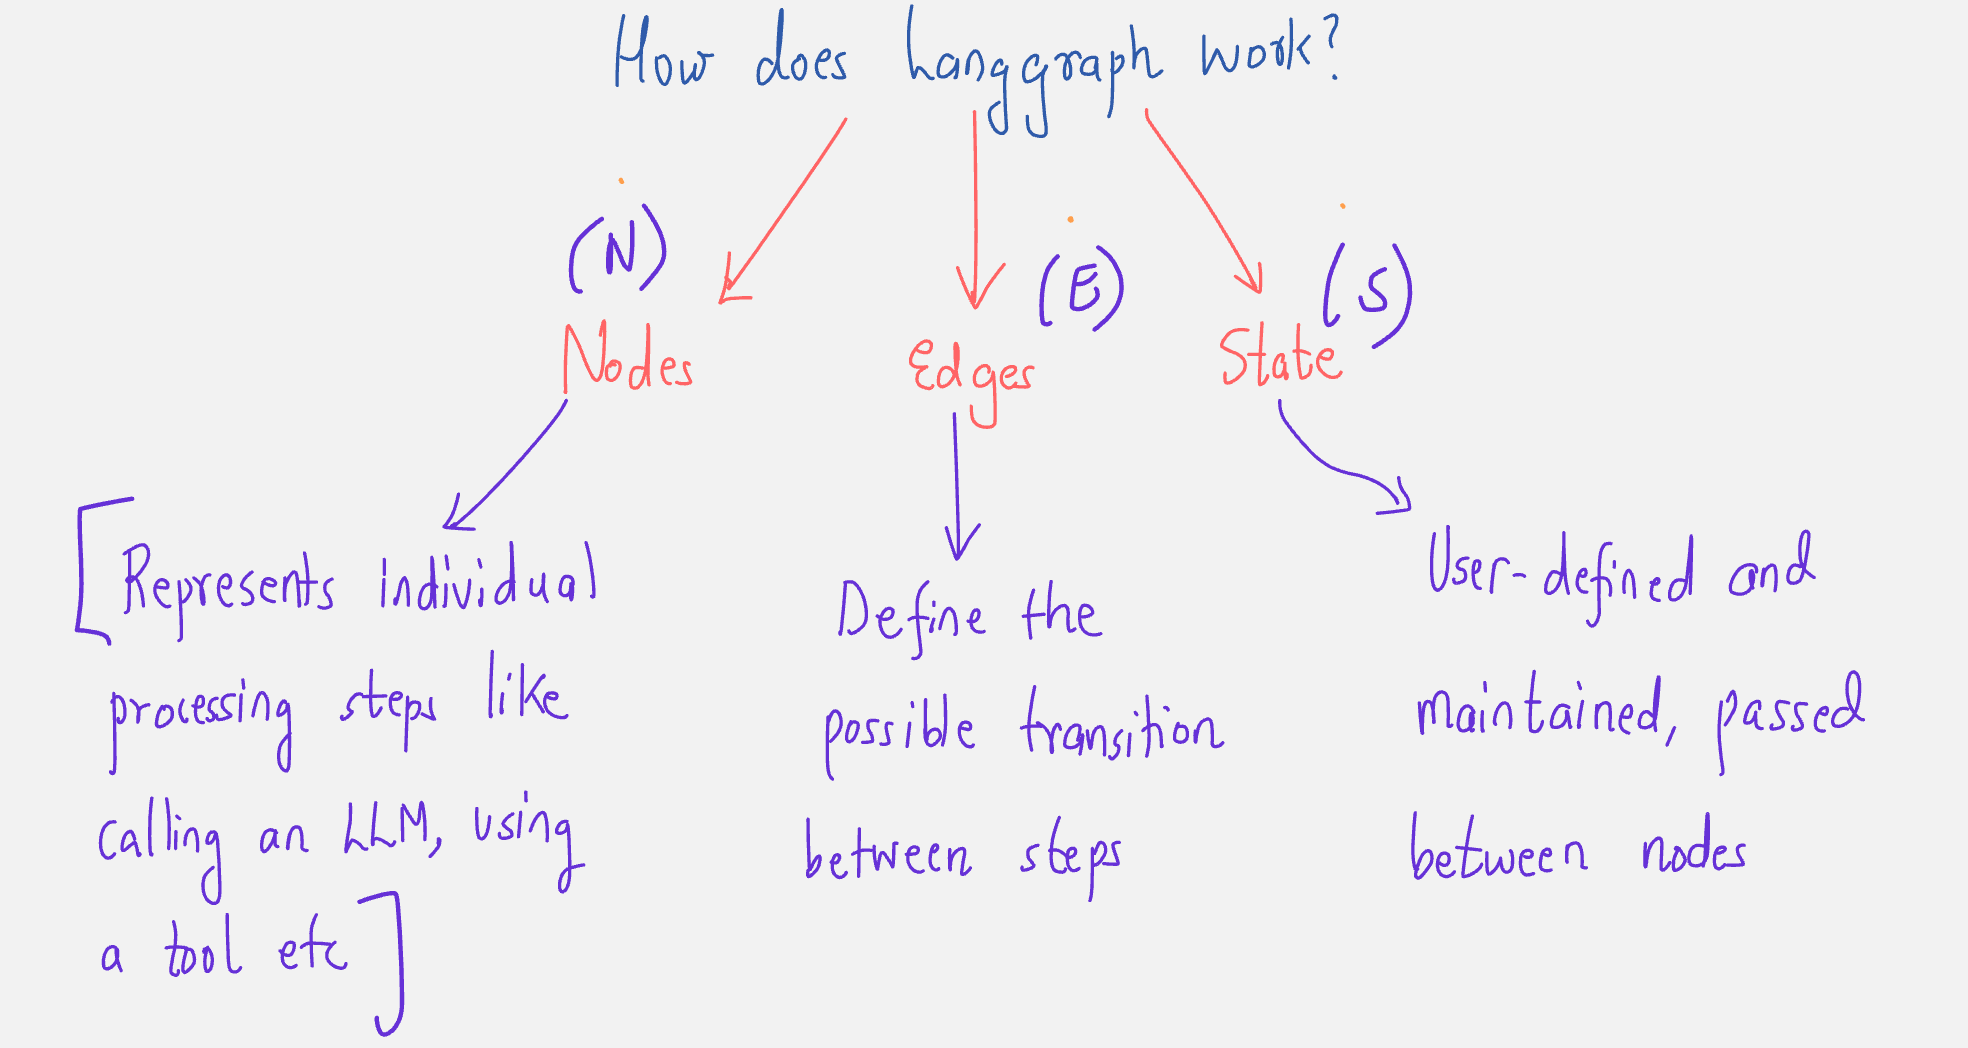
Node (N): An individual processing step. In code, a node is typically just a Python function that takes the current state as input, performs an operation (like calling an LLM or a utility tool), and returns an updated state. Nodes can encapsulate actions such as calling an LLM API, executing a math calculation, reading a file, or even invoking another agent. Essentially, if you can write it as a function, you can make it a node. For example, one node could classify an email as spam/ham, another node could draft a reply email. Each node focuses on one sub-task of the workflow.

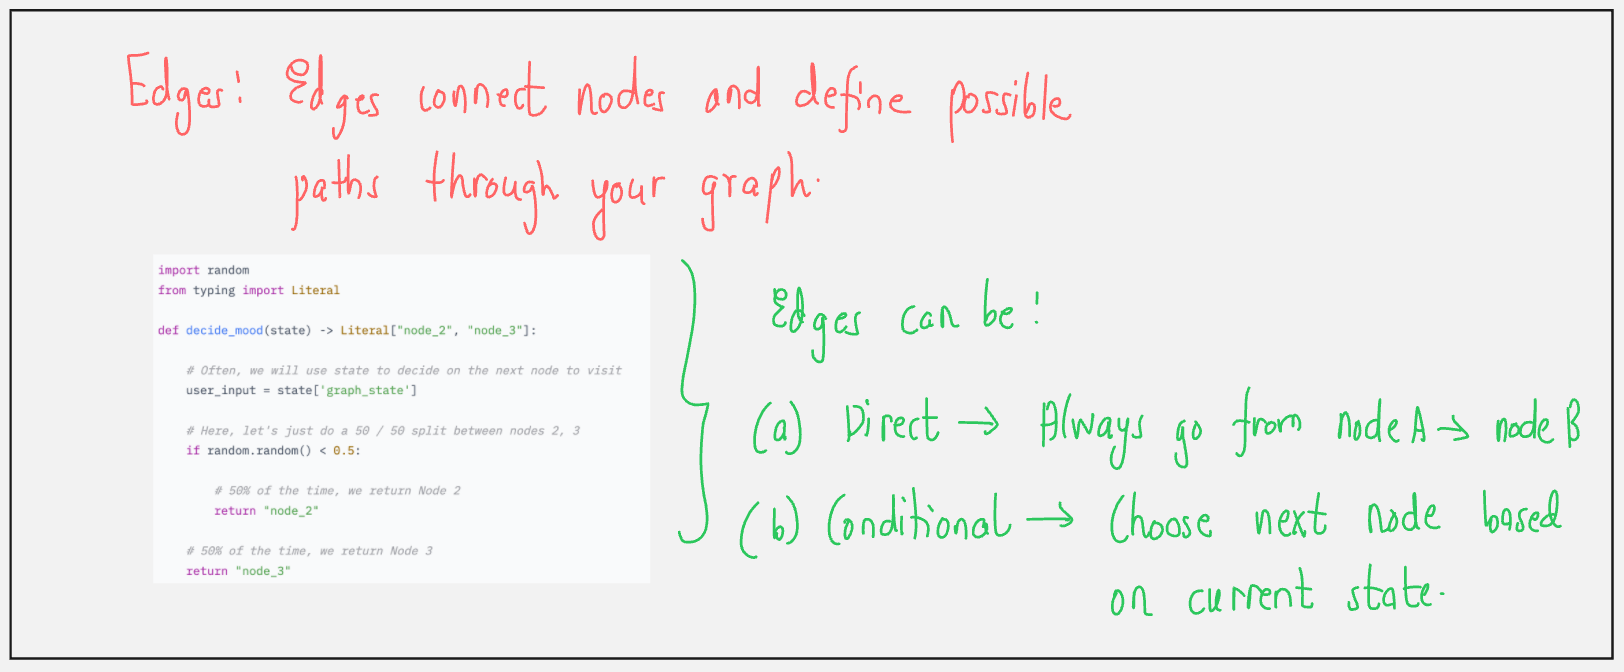
Edge (E): A directed connection between nodes that determines the order of execution. After a node finishes, which node runs next? That’s decided by edges. Some edges are simple linear progressions (“after Node A, go to Node B”), while others are conditional – they route to different nodes based on the current state. For instance, after an email is classified, you might follow the “spam” edge to a spam handling node, or the “legitimate” edge to a drafting node, depending on the classification result. LangGraph provides helpers to define these branching rules easily. Edges enable the dynamic decision-making in the agent’s flow.
State (S): A data object that contains all the information the agent needs as it executes. This is often a dictionary or a TypedDict that you define. The state persists throughout the agent’s run, allowing nodes to read what previous nodes did and to record new information. For example, the state might hold the email being processed, a flag for spam/not-spam, a draft response, and any other context. Because every node can access and modify this shared state, the agent can maintain context and memory across the workflow. State is what makes LangGraph stateful – unlike a stateless chain, the graph’s state can evolve with each step and even be revisited by loops.

Using these three elements, you construct a StateGraph (the core LangGraph object) that ties it all together. You add your nodes (associating them with the functions to execute), then connect them with edges (defining the flow logic). Finally, you designate a START node (where to begin) and an END (when to stop). The result is a flexible graph representation of your agent’s logic, which you can visualize and execute. We saw in the lecture how this approach handles complexity: you can branch or loop as needed, and because the state is always carried along, the agent’s decisions can depend on everything that happened before.

As an example of why this matters, imagine a task management assistant that can add tasks, mark them done, and summarize tasks. This isn’t a linear process – the user might add two tasks, complete one, add another, then ask for a summary. LangGraph lets you model this as a loop where the assistant node keeps prompting for user input, and based on the input, different nodes get triggered (add-task node, complete-task node, or summarize node), updating a shared task list in the state. The workflow can circle around as needed until the user is done.
This kind of interactive, conditional loop is exactly what LangGraph was built for, whereas a static chain would struggle to handle it gracefully.
With the fundamentals covered, let’s get hands-on and see LangGraph in action through the two agents we built during the session.
(3) Building an Email Sorting Agent (LangGraph Example)
Our first practical example was an AI email-processing assistant – essentially a smart email sorter and responder. We framed this scenario playfully: think of Alfred, the trusty butler, managing Bruce Wayne’s inbox. Alfred’s job is to screen incoming emails, weed out the spam, and draft a polite response for legitimate mails to save Bruce (Batman) some time. This example showcased how LangGraph handles conditional branches and stateful memory in an agent.

State design: We defined an EmailState to hold everything our agent needs to know while handling an email. This state included the email content (sender, subject, body), a flag is_spam (True/False after classification), an optional spam_reason or category, a drafted response (email_draft text), and a message history for the LLM interactions. By centralizing these in the state, each node could read and write the fields it cares about – for instance, the spam classifier node sets is_spam, the drafting node writes email_draft, etc. The state persists through the workflow, ensuring that by the end, we have all relevant info (spam status, draft text, etc.) to present to the user.
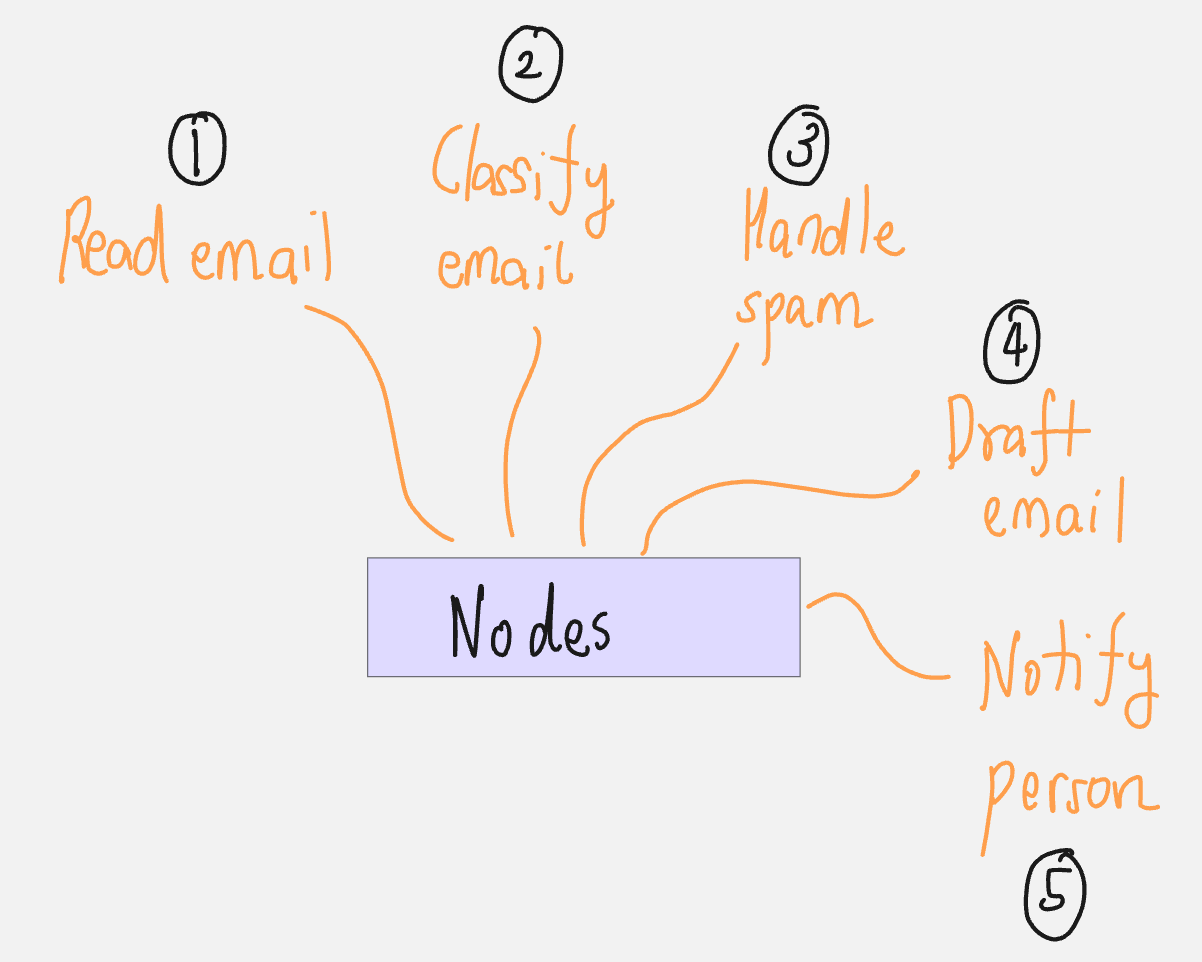
Nodes: We created five main nodes as simple Python functions, each corresponding to a step in the email workflow:
read_email – Simulates Alfred “reading” the new email. In practice, this node just prints a log like “Processing email from <sender> with subject <...>” and doesn’t change state (it just acknowledges the email).
classify_email – Uses an LLM to analyze the email and decide if it’s spam. This node prompts a GPT-4 model with the email contents, asking for “SPAM or HAM”. It then interprets the response to set
is_spamin the state (and logs the model’s answer). If the email is not spam, we also append this interaction to themessageshistory so that the model’s reasoning can be referenced later when drafting a reply. (If it was spam, we don’t need a draft, so we won’t include it in the history.)handle_spam – If the email was flagged as spam, this node handles that branch. In our demo, it just prints out that “Alfred has marked the email as spam and moved it to the spam folder.” Nothing more is needed, as spam gets no reply.
drafting_response – If the email was legit (not spam), this node calls the LLM to draft a response email. It provides the original email content to the model with instructions to compose a brief, polite reply that Bruce Wayne can later review. The AI’s draft is stored in the
email_draftfield of the state. We also update themessageshistory with this query and result.notify_mr_wayne – The final node for legitimate emails. This simulates Alfred notifying Bruce: it prints a summary along the lines of “You received an email from X (subject Y). I’ve screened it and prepared a draft response for your review”, then prints the draft content. This is just for our demo output, but you can imagine in a real system this node might send a notification or record the draft somewhere.
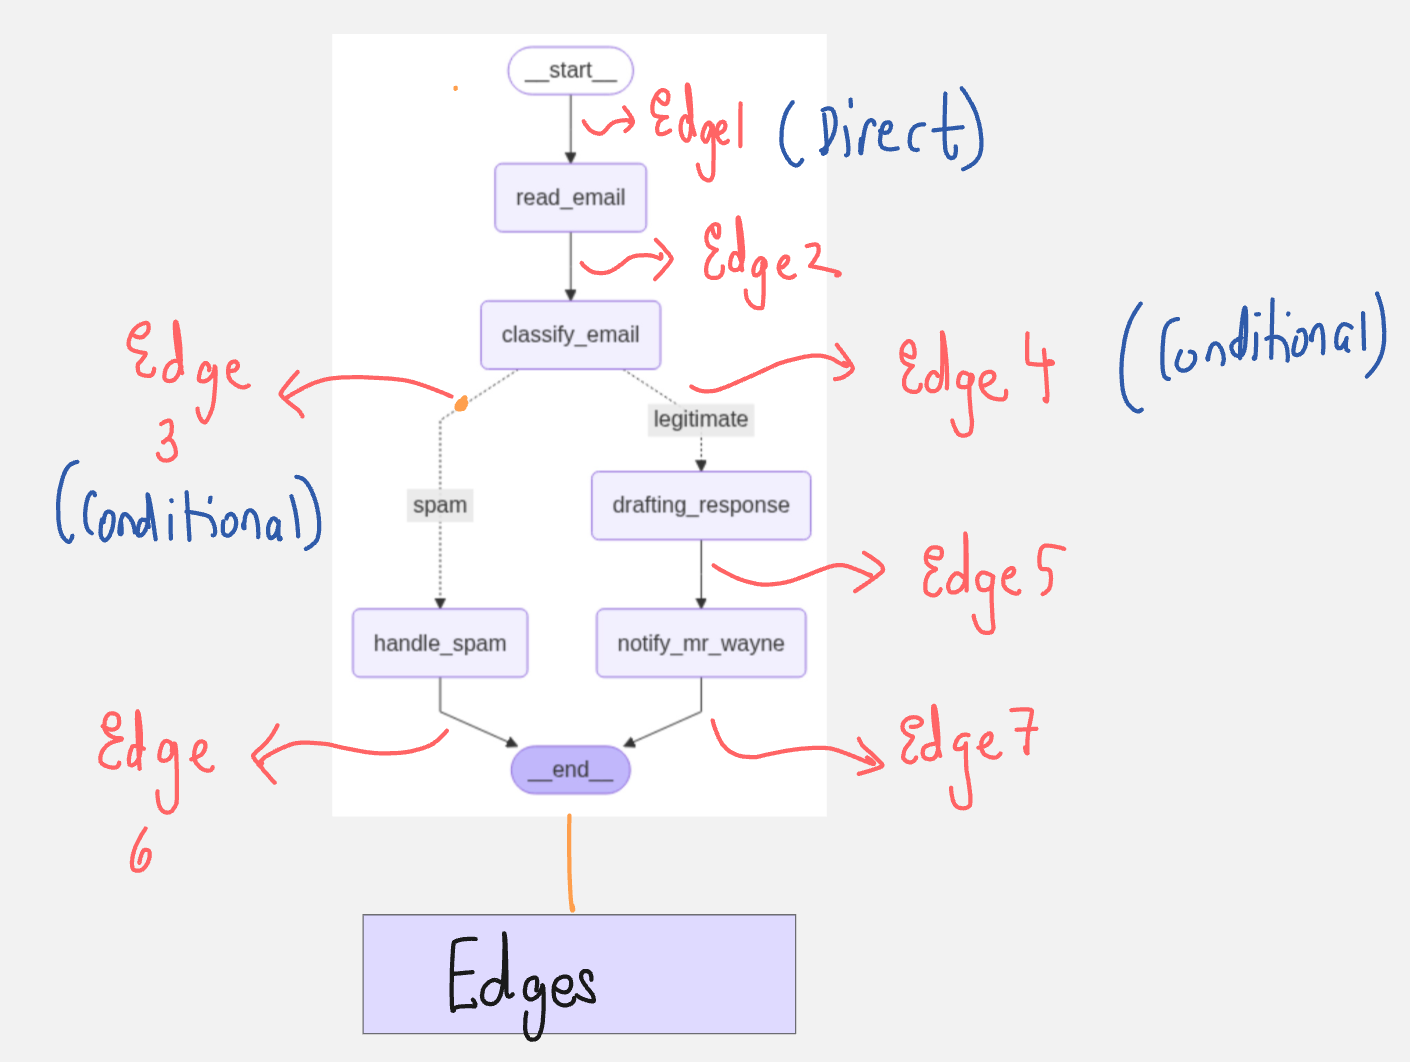
Edges: With our nodes ready, we constructed the LangGraph workflow by adding nodes and defining edges:
We start at
read_email. From there, we always go toclassify_email(one straightforward edge).After
classify_email, we need to branch: if the email was spam, go tohandle_spam; if not, go todrafting_response. We achieved this via a conditional edge that uses a routing functionroute_email(state) -> "spam" or "legitimate". LangGraph’sadd_conditional_edgesmakes it easy: we provided the source node, the routing function, and a mapping of"spam"->handle_spamnode,"legitimate"->drafting_responsenode.The
handle_spamnode is an end-of-line for that branch, so we connecthandle_spamdirectly to END (workflow terminates after handling spam).For the other branch, after
drafting_responsewe add an edge tonotify_mr_wayne(since if we drafted a response, the next step is to notify Bruce). Then fromnotify_mr_waynewe go to END.
The resulting graph is a forked path: one path (spam) ends quickly, the other path (not spam) continues through drafting and notification. We effectively defined an if/else logic for our agent without burying it in code – the graph’s structure makes the possible routes explicit. The LangGraph library even allows us to visualize this workflow as a diagram. In the lecture, we rendered the graph and saw something like: Start → read_email → classify_email → (if spam) handle_spam → End, (if not) drafting_response → notify_mr_wayne → End. This visual clarity is a nice perk of LangGraph’s approach.

We tested our email agent on two sample emails: one which is not a spam, and another from a “Crypto bro” shilling a coin (which was correctly flagged as spam). The LangGraph agent processed each according to plan, demonstrating the conditional flow:
For non spam email, the agent classified it as HAM (not spam), drafted a polite response and presented the draft.
For the crypto spam, the agent immediately routed to the spam handler and ended, drafting nothing.
Through this example, we saw how LangGraph makes it straightforward to add branching logic to an agent. The code was organized in small, testable functions (nodes) and the graph definition clearly outlined the workflow.
Adding a new rule (say, a special handling for “urgent” emails) or a new node would be relatively easy by adjusting the edges and state, rather than rewriting a monolithic agent loop. This kind of extensibility is a big advantage of the graph approach.
(4) Creating a Vision Assistant Agent (LangGraph Example)
The second example took things up a notch by incorporating a vision component. We built a simple Vision Assistant – an agent that can analyze an image and answer questions or perform tasks based on that image. To make it interesting, we also gave it a basic calculation tool. This agent demonstrates how LangGraph can implement the classic “Thought → Action → Observation” loop (a hallmark of tool-using agents) in a very explicit way. We effectively created a mini agent that can decide to use tools and iterate until it arrives at an answer.
State design: We defined an AgentState for this agent with two fields: input_file (the path or URL of the image to analyze) and a messages list (to store the conversation or reasoning messages). The image path goes in, and as the agent works, it will accumulate a history of LLM messages (similar to how we kept messages for the email agent). Since this assistant might perform multiple reasoning steps (with tools), maintaining the messages context is important – it lets the assistant remember what it has done or discovered so far.
Nodes: This agent’s workflow essentially has two main functional nodes in a loop:
assistant – an LLM-powered node that acts as the “brain” of the agent. We set up a GPT-4 model (with vision capability) and bound some tools to it. In LangChain terms, we created an
llm_with_toolsthat knows about two tools: one to extract text from an image, and one to do a simple math division. The assistant node function takes the current state (which includes any conversation so far), and it constructs a prompt for the LLM. We gave it a system instruction explaining its capabilities: it can analyze images and run computations using the available tools. We then include the user’s query or task (frommessages) and call the LLM. Crucially, this LLM is set up such that if it decides to use a tool, it will output a special format indicating a tool call (this is handled under the hood by the LangChain tool binding). The assistant node returns the updated state with the LLM’s output (either an answer or a tool request) appended to the message history.tools – a node representing the agent’s tool execution step. We used LangGraph’s
ToolNodeabstraction here. Essentially, when the assistant decides to invoke a tool likeextract_textordivide, the flow goes to thistoolsnode, which actually executes the tool’s function and records the result. For example, if the assistant’s last output was “<<call tool extract_text('image.png')>>”, the tools node will run ourextract_textfunction on that image, get the extracted text, and update the state (likely adding the tool’s result to the message history as a system/assistant message). The tools node then hands control back to the assistant for the next reasoning step.

Workflow Loop: The key to making this work is how we connect the edges. We start with the assistant node (the agent thinks first). After the assistant node, we need to decide: did the model finish answering, or does it want to use a tool? LangGraph has a utility edge condition called tools_condition that checks the model’s output to see if it’s a tool call. We used this to create a conditional edge from assistant:
If the assistant’s output was a tool request, go to the
toolsnode.Otherwise (no tool requested, meaning the assistant gave a final answer), go to END.
Then, we added an edge from tools back to assistant. This creates a cycle: the assistant thinks → decides to use a tool → tool executes → assistant thinks again (now with the tool result in context) → maybe it uses another tool or gives final answer → and so on. This loop will continue as long as the assistant keeps requesting tools. Once the assistant produces a normal answer, the tools_condition will route to End instead of the tools node, breaking the loop. In effect, we manually implemented the logic LangChain agents perform internally: the ReACT loop of thought and action.
With this LangGraph setup, we essentially built a vision-enabled agent from scratch. To test it, we tried scenarios where an image needed to be processed. For instance, we provided an image (e.g. a photo with text in it) and asked the agent to read the text and do something with it.

For the above image, here was the agent response:

This demonstrated how LangGraph gives us explicit control over the agent’s decision cycle. We didn’t have to rely on hidden prompts or complex agent classes – we literally connected the LLM to a Tools executor with a loop. By examining the state after each step, we could observe how the model’s “thoughts” (tool requests) and the “observations” (tool outputs) were logged in the messages. This level of transparency is great for debugging and understanding agent behavior.
By the end of these examples, we had a solid grasp of LangGraph’s capabilities. We built an email triaging agent with conditional branching and a vision question-answering agent with a tool-use loop. Both scenarios would be challenging to implement cleanly in a linear paradigm, but LangGraph handled them with a clear structure (and some help from GPT-4 of course!).
(5) Tracing Agent Workflows with Langfuse

After constructing these advanced agents, the lecture wrapped up with an important consideration: How do we observe and debug an agent’s behavior, especially when it has many steps and decisions? This is where Langfuse comes into play.
In the context of our LangGraph agents, we want to capture traces of each run – a trace is a detailed record of the agent’s execution: what prompts were sent to the LLM, what the responses were, which path (edges) were taken, which tools were used, etc. During the session, we instrumented our agents with a tracing callback (using Langfuse in code) to collect this data. Tools like Langfuse can ingest these traces (via OpenTelemetry standards) and provide a user-friendly dashboard to inspect them.

In our lecture demo, we set up Langfuse and were able to monitor the email agent as well as the vision agent. We can also observe the tools-assisstant loop clearly in Langfuse as shown in the below image.

To summarize, the closing lesson was that after building powerful agents with LangGraph, you should also leverage observability tools like Langfuse to trace, evaluate, and continuously improve those agents. With Langfuse, you have an accessible way to answer “why did my agent do X?” by inspecting the recorded trace of its actions and thoughts.
Observability and evaluation is an important best practice when moving from prototypes to production-grade AI systems.
(6) Wrap-Up and Next Steps
Day 8 was packed with advanced content – we introduced a new framework (LangGraph), built agents that go beyond linear thinking, and learned how to keep an eye on our agents via tracing. This sets the stage for even more sophisticated applications. By mastering LangGraph, you’ve essentially learned how to “think in graphs” when designing AI agent logic, which will be invaluable for future projects that involve multiple steps or agents.
See you in Day 9! 👋